Playstation3 - NAT Type Connectivity Issues
Playstation3 - NAT Type Connectivity Issues
If you are having issues not being able to communicate with the PS3 network, or cannot use voice / video chat, you could be having a Network Address Translation (NAT) issue with your router or Internet gateway device. Sony breaks NAT into three different types on their Internet Connection Test.
If you are having issues not being able to communicate with the PS3 network, or cannot use voice / video chat, you could be having a Network Address Translation (NAT) issue with your router or Internet gateway device. Sony breaks NAT into three different types on their Internet Connection Test.
- Type 1: Connected directly to the Internet
- Type 2: Connected to the Internet via a router
- Type 3: Connected to the Internet via a router
- With type 3, you may not be able to communicate with other PS3 systems, or voice and video communication may not work properly. It is also possible that UPnP has been disabled on your network device/router.
Find out if you are having a NAT issue:
Port Triggering Setup on a Linksys Router:
Alternate Method (Port Forwarding):
To setup Port Forwarding, there are two main parts that must be done. First we will need to setup a static IP address on the Playstation3 and second is setting up the port forwarding on the router.
NOTE: By enabling a static IP address on your Playstation3, you may run in to connectivity issues when attempting to connect to the internet at different locations. If you do run in to connectivity issues at other locations, you must turn off the static IP.
Part 2. Setting up Port Forwarding on a Linksys Router
To find out if you are having NAT issues, you can test your connection by following the directions below.
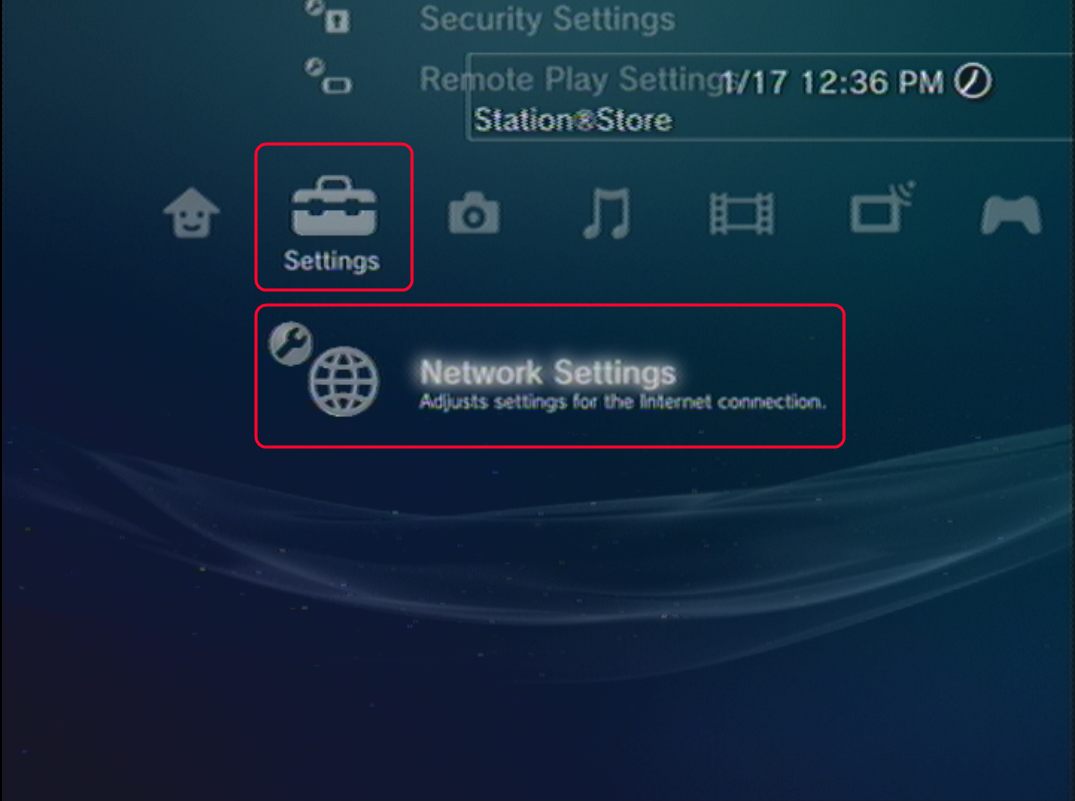
- From the main PS3 home screen, please go to the left and select Settings.
- We will then need to go to the bottom and selectNetwork Settings.
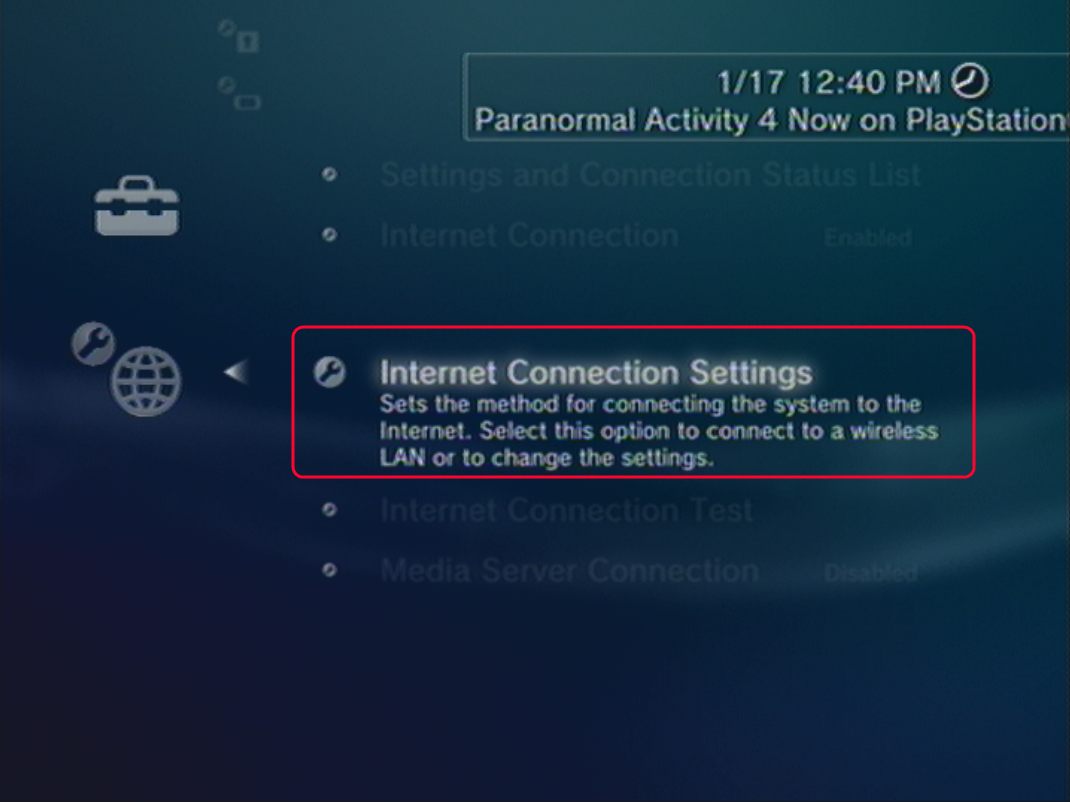
- In Network Settings, you will want to select Internet Connection Test.
- The test will automatically begin and will show you the results for UPnP and NAT Type.
If your test results in a NAT Type 3, please continue below to help resolve your issue.
Resolving NAT Issues:
Select Your Method
Preferred Method (Port Triggering)
Choose your brand of router:


Port Triggering Setup on a Comtrend Router:
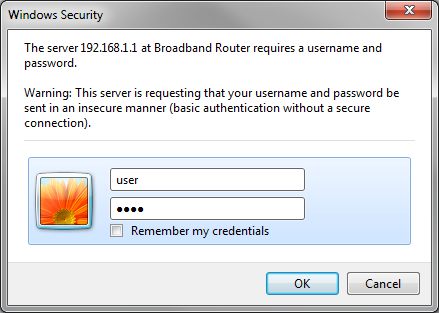
- To begin, we will want to use a Internet enabled device with a web browser. (A computer or laptop will work best for this but a tablet or phone connected to Wi-Fi will work as well.) Now we will want to open up your web browser (Ex: Internet Explorer) and clear out the address bar at the top. Now type in 192.168.1.1 and press Enter.

- You should now be prompted for the username and password to the router. The username is user and the password is user. Then press OK.
NOTE: If this username and password does not work, please try the following:
Username: root Password: 12345
Username: root Password: central
Username: support Password: support
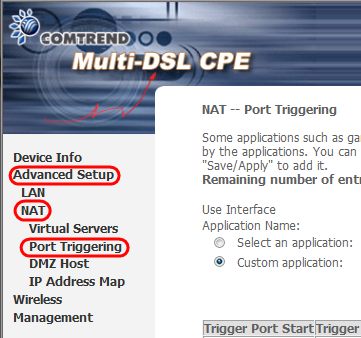
- Once logged into the Comtrend, click on Advanced Setup on the left hand side. Then click on NAT and then click on Port Triggering. Finally click on Add to begin setting up the Port Triggering.
- Here we will select the correct User Interface (ex: PPPoE) and the bullet next to Custom Application. In the box next to it, type in PS3. Then you will want to enter the following information into the table:
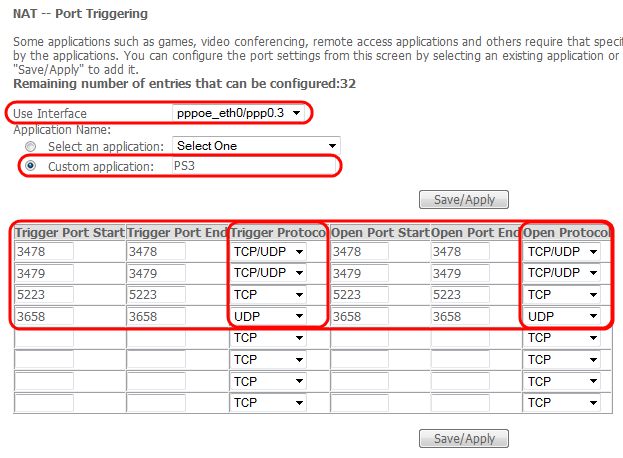
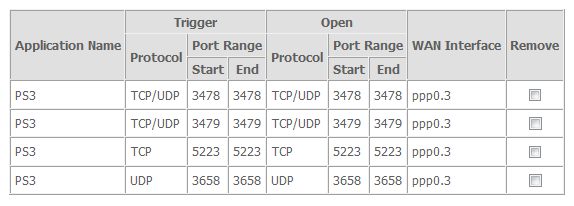
- Port triggering should now be setup in the router. You may need to wait a couple of minutes for the settings to take affect. If you are still getting the NAT error, please remove the ports we just added and follow our Alternate Method (Port Forwarding).
Port Triggering Setup on a Linksys Router:
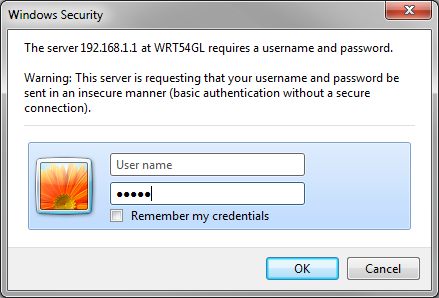
- To begin, we will want to use a Internet enabled device with a web browser. (A computer or laptop will work best for this but a tablet or phone connected to Wi-Fi will work as well.) Now we will want to open up your web browser (Ex: Internet Explorer) and clear out the address bar at the top. Now please type in 192.168.1.1 and press Enter.
- You should now be prompted for the username and password to the router. For a standard Linksys router you will leave the username blank and type admin for the password. Some Linksys router do require admin for the username and admin for the password.
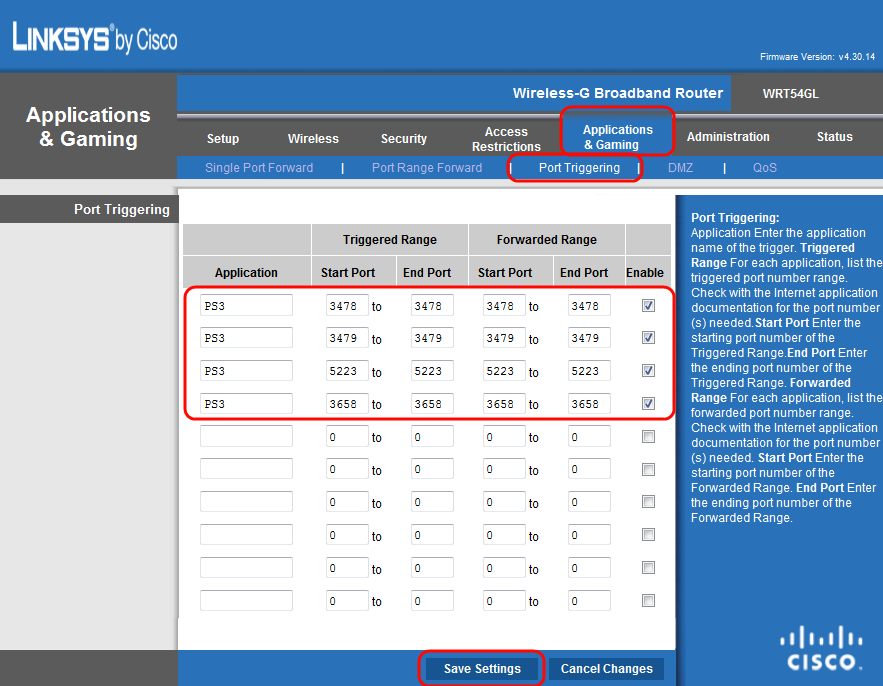
- Once logged in to the Linksys router, click on Applications & Gaming at the top and then Port Triggering in the sub-menu. On the Port Triggering page, enter the following values and then press Save Settings at the bottom. You may click the image to enlarge the text.
- Port Triggering should now be set up in your Linksys. You may need to wait a couple of minutes for the Linksys to save the settings and take affect. If you are still getting the NAT Error, please follow our Alternate Method (Port Forwarding).
Alternate Method (Port Forwarding):
To setup Port Forwarding, there are two main parts that must be done. First we will need to setup a static IP address on the Playstation3 and second is setting up the port forwarding on the router.
NOTE: By enabling a static IP address on your Playstation3, you may run in to connectivity issues when attempting to connect to the internet at different locations. If you do run in to connectivity issues at other locations, you must turn off the static IP.
Part 1. Setting up a Static IP on your Playstation3:
- To start we will need to be at the main home screen of the Playstation3. Then move the menu to the left until you reach Settings. From here you will to move to the bottom until you have selected Network Settings.
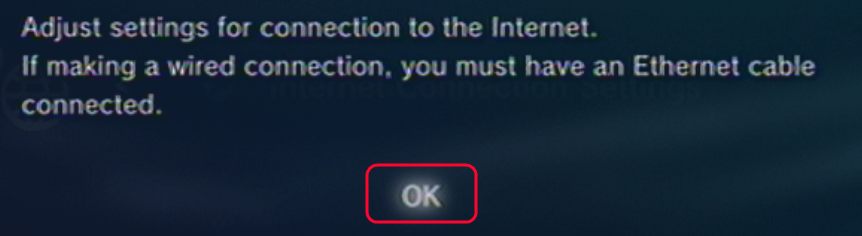
- Within Network Settings, we will want to select Internet Connection Settings. At the prompt for an Ethernet cable select OK to continue.
- At the Select a setting method screen, please select Custom.
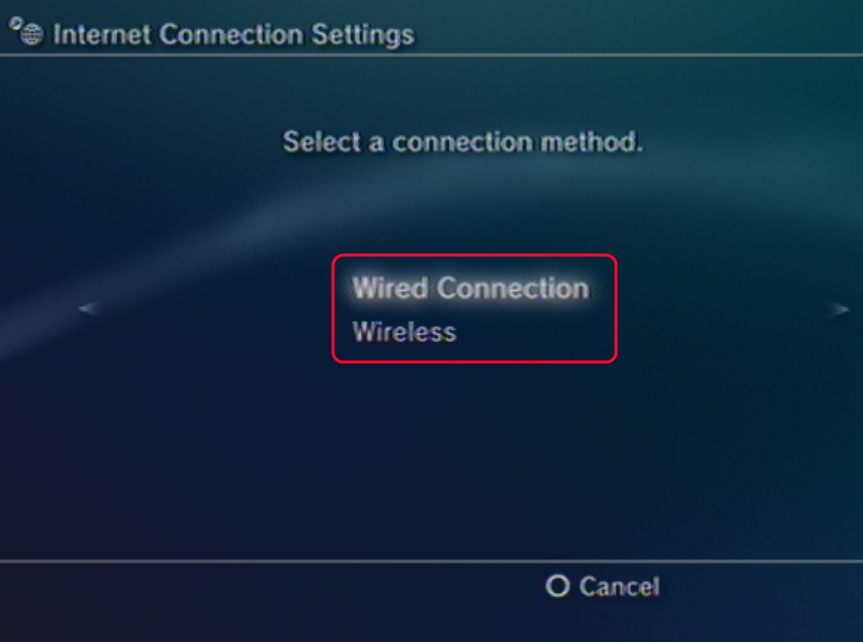
- For the Select a connection method, you will want to select whether you want to configure this for a Wired Connection or Wireless. The examples below will be for the wired connection but the same IP address information can be applied to either connection type.
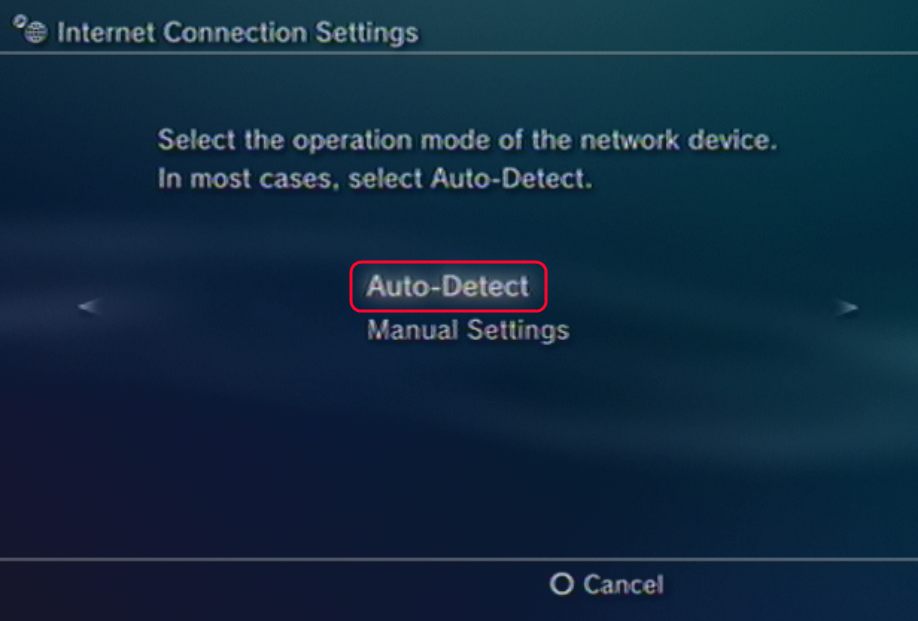
- At this screen, the Playstation wants to know what network duplex speed to use. Here it is best to select Auto-Detect.
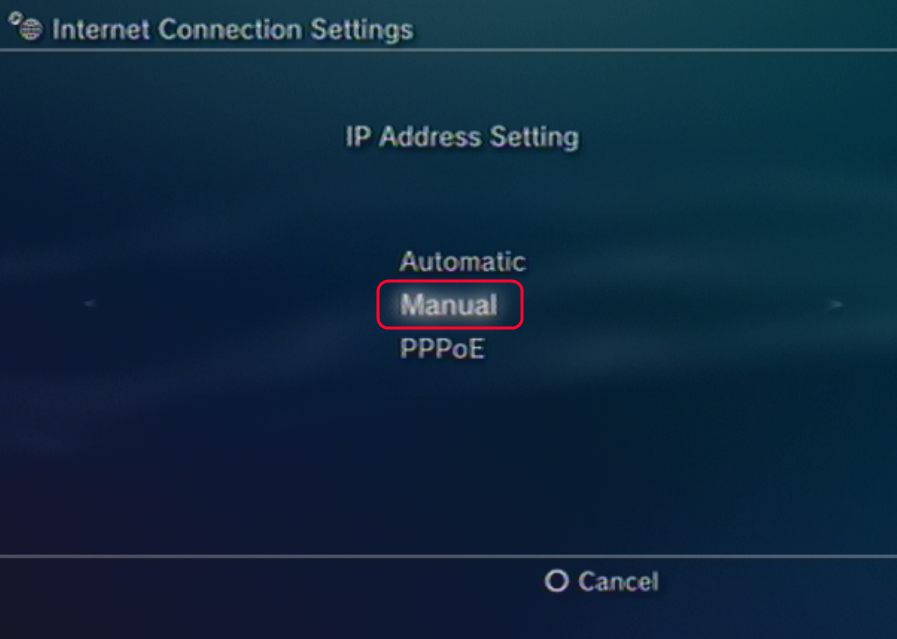
- Once at the IP Address Setting, we will want to select Manual.
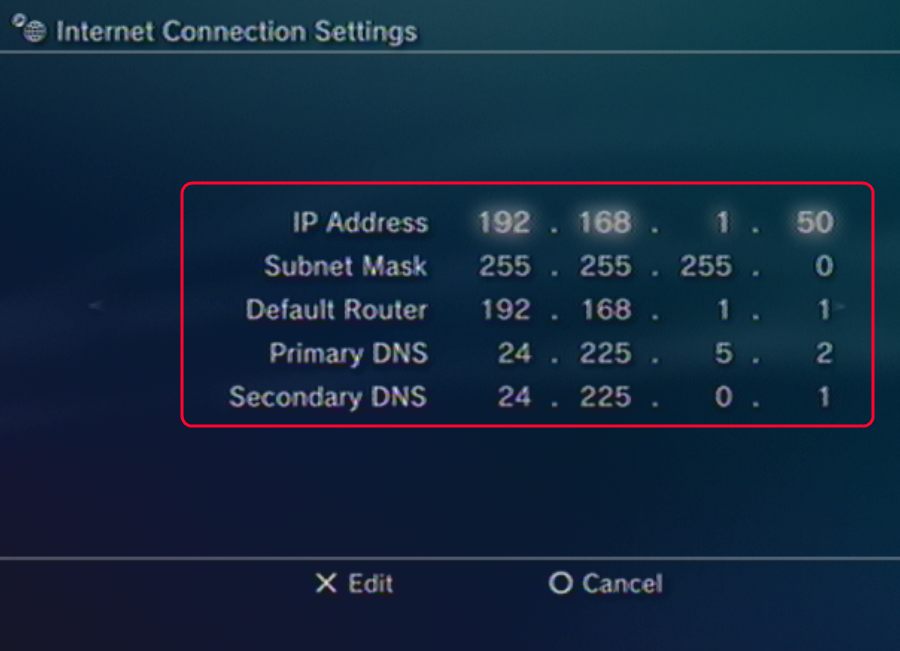
- The next screen will prompt you for the IP address information. You may use this information displayed below for your Playstation.
NOTE: If you have multiple Playstations, you will not be able to use the same IP address for each device. The information we have displayed will work for our typical Comtrend or Linksys router IP addressing schemes. If your router is located at a different IP address, you will need to adjust the IP address information to fix.
- For the MTU settings, please select Automatic.
- At the Proxy Server screen, select Do Not Use, unless you know you are using a Proxy Server. If you are not sure, then most likely you do not use a Proxy Server.
- We will also want to leave UPnP Enabled.
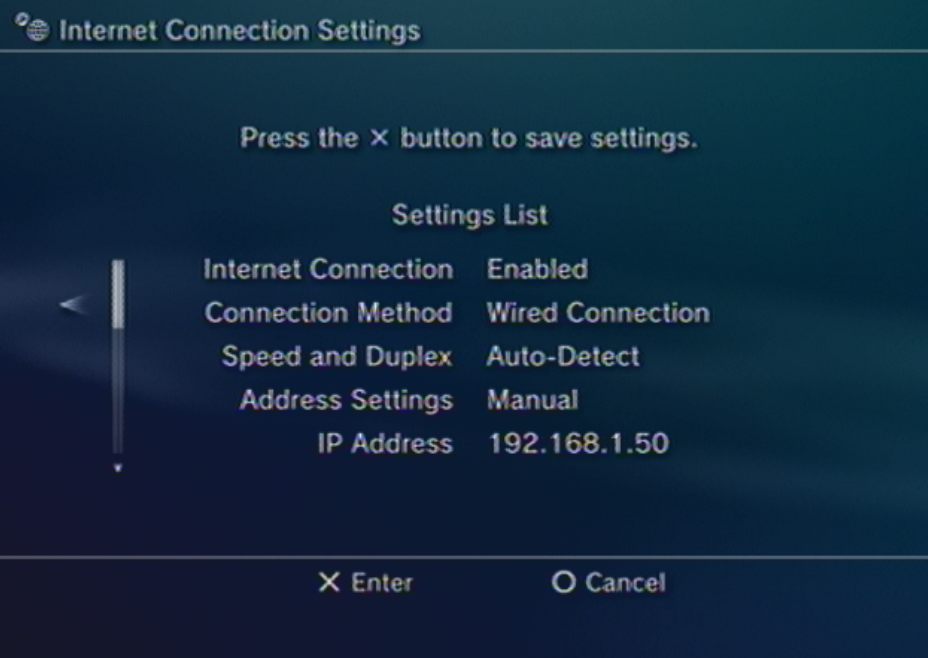
- You will now be at the Settings List. Here you can verify your settings and then hit X button to save the settings. You can run the Test Connection at the end of setup to test for an Internet connection and proper IP configuration but it will still show the incorrect NAT type until you finish Part 2 of this guide.
Choose your brand of router:
Part 2. Setting up Port Forwarding on your Comtrend Router:
- To begin, we will want to use a Internet enabled device with a web browser. (A computer or laptop will work best for this but a tablet or phone connected to Wi-Fi will work as well.) Now we will want to open up your web browser (Ex: Internet Explorer) and clear out the address bar at the top. Now type in 192.168.1.1 and press Enter.
- You should now be prompted for the username and password to the router. The username is user and the password is user. Then press OK.
NOTE: If this username and password does not work, please try the following:
Username: root Password: 12345
Username: root Password: central
Username: support Password: support

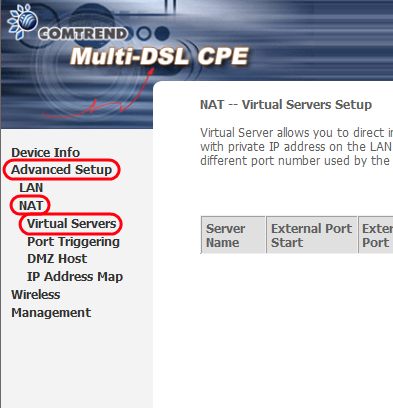
- Once logged into the Comtrend, click on Advanced Setup on the left hand side. Then click on NAT and then click on Virtual Servers. Finally click on Add to begin setting up the Virtual Servers.
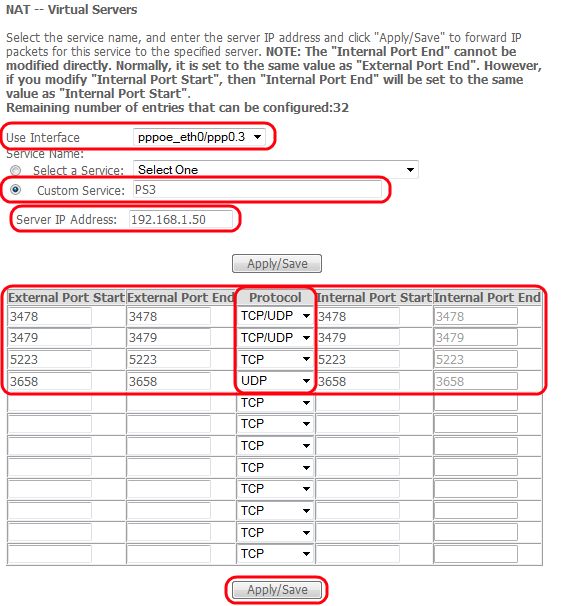
- In the Virtual Servers section you will want to select the Interface. We will want to use the PPPoE interface for most cases. Then you will want to select Custom Service, here you can put PS3. Next we will want to enter the Server IP address of the PS3 that we set, for our example we'll use 192.168.1.50. Now you will want to enter the following port information that is shown below. Please notice the Protocols that are being used as well. Once you have entered all the information, please click on Apply/Save. You may click the image to enlarge the text.
- Once you have hit Save/Apply, you should see the following screen. You should then be able to use the Playstation3 with a Type 2 NAT.
You may click the image to enlarge the text.

Part 2. Setting up Port Forwarding on a Linksys Router
- To begin, we will want to use a Internet enabled device with a web browser. (A computer or laptop will work best for this but a tablet or phone connected to Wi-Fi will work as well.) Now we will want to open up your web browser (Ex: Internet Explorer) and clear out the address bar at the top. Now please type in 192.168.1.1 and press Enter.
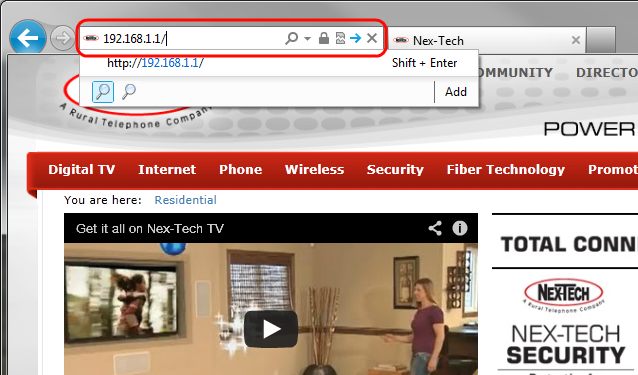
- You should now be prompted for the username and password to the router. For a standard Linksys router you will leave the username blank and type admin for the password. Some Linksys router do require admin for the username and admin for the password.

- Once logged in to the Linksys router, click on Applications & Gaming at the top and then Port Range Forward on the sub-menu. Enter the following information in the Port fields. Once completed, press Save Settings at the bottom of the page. You may click the image to enlarge the text.
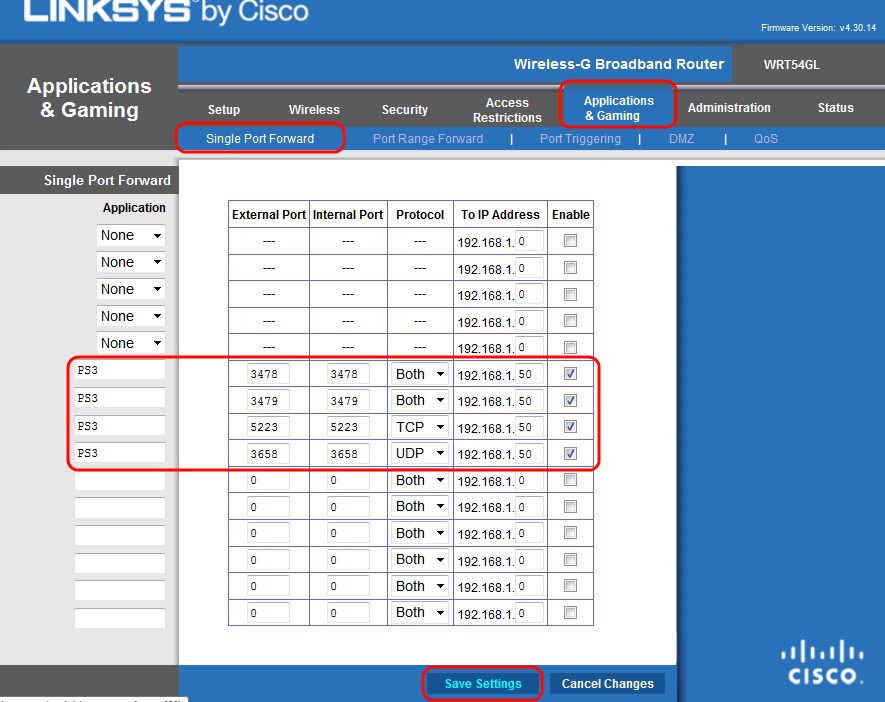
- Port Forwarding should now be set up in your Xbox 360 and Linksys. You may need to wait a couple of minutes for the Linksys to save the settings and take affect.