Importing/Editing Images in iPhoto
Importing/Editing Images in iPhoto
How to Import and Edit Images using iPhoto on Mac OSX
- Turn on your Mac and then use a USB or FireWire cable to connect your camera to your Mac.
- Turn on your camera and make sure it’s in playback or view mode. Notice how iPhoto opens automatically.
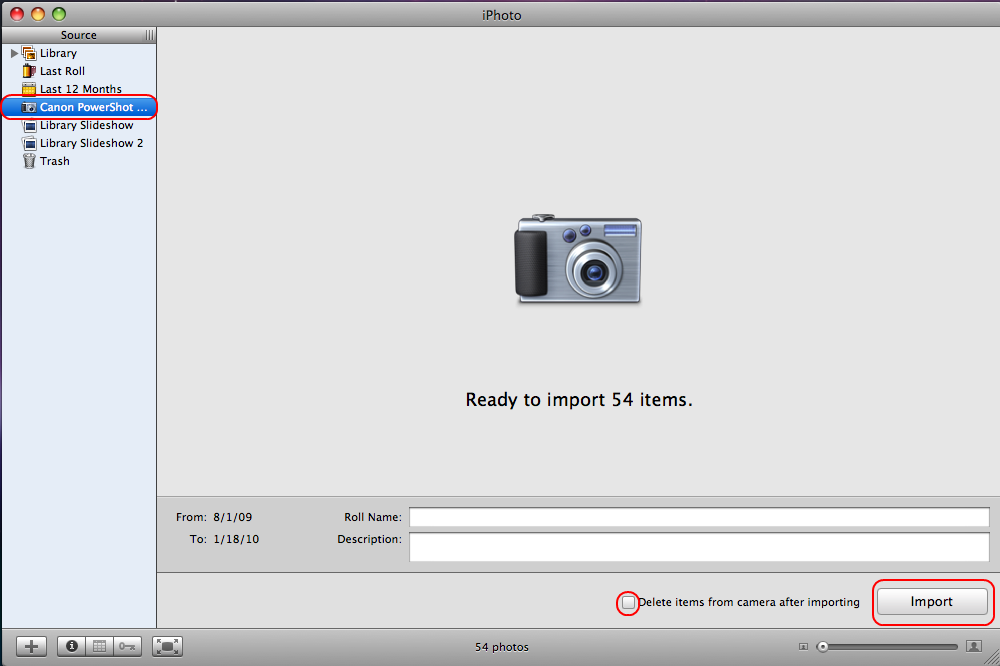
- Select your camera in the iPhoto Source list.
- To help with organizing the photos in your library, enter a name and description that will help you identify the photos you are about to import.
- If you want iPhoto to clear the pictures on your camera as part of the import process, select the “Delete items from camera after importing” option at the bottom of the import window.
- When you’re ready, click the Import button.
- Watch as your photos are imported into iPhoto. When it is finished importing, iPhoto takes you to the library, so you can preview and organize your photos.
- After you finish importing your photos, click the Eject button or drag the camera’s icon from the Finder desktop to the Trash (if necessary), turn off your camera, and then disconnect it from your computer.

Basic iPhoto Editing Features
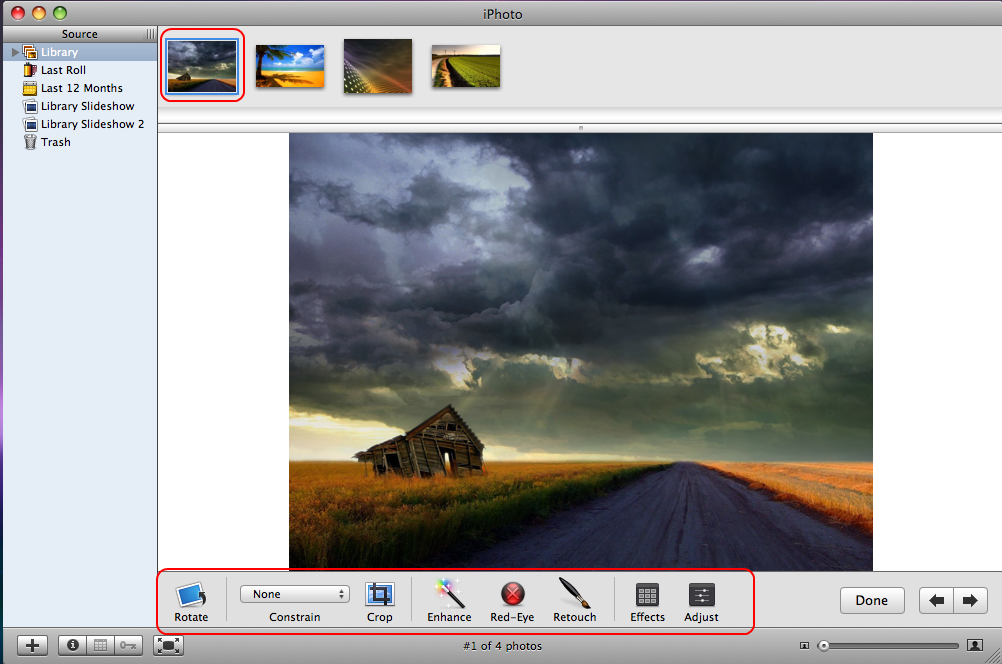
- Rotate Tool: The rotate tool will allow you to rotate your photo in 90 degree increments. This is a great tool for photos that are sideways of upside down!
- Crop Tool: The crop tool will allow you to crop portions of your photo that you don't want. Simply click the crop tool and then move the box around the photo until only the desired area of the photo appears in the box. Click Apply to save your changes. If you decide later to change it again, simply return to the crop tool and your entire photo will be available again.
- Enhance Tool: Enhancing the photo will automatically adjust the brightness, color and shade. If a picture is very bright, the enhance button will attempt to automatically fix it. If you click it and do not like the outcome, then you can undo the edit by using the short keys Apple+Z
- Red Eye Tool: The Red Eye Tool is used to remove red eye's in photos. Simply click the red eye tool and then click in the center of the person's eyes that need adjusting. The tool with likely be set at automatic, but if you need a different size, choose manual and then adjust the size by moving the slider to the right to increase it and to the left to decrease the size.
- Retouch Tool: The retouch tool in iPhoto is a great tool that you can use to erase small defects in your photos. Simply click the retouch tool icon and then click on a small defect in your photo. It should disappear.
- Adjust Tool: The adjust tool is a great tool for making larger adjustments to your photos. It's quite an in-depth tool, so if you'd like to use this one - read the article in the resource section on using the adjust tool in iPhoto.
- Effects Tool: You can add effects to your photo. Things like making the photo sepia, black and white or boosting the color can all be done under this option. There are 8 different choices to choose from, and if you don't see something you like then you can just click on normal.
- iPhoto makes it easy to keep all pictures organized by being able to create a new Album.
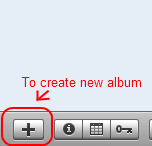
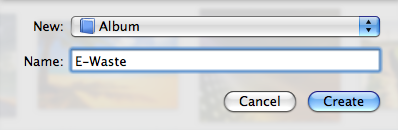
- To do this, click on the + at the bottom left of the Source Pane. Next iPhoto will ask us what we want to name our album, after you have properly entered an album name, click Create.
- If you already have a library full of photos and you would like to organize them more, the easist method is the Drag & Drop method.
- You should by now see your newly created album in the Source Pane, if you do, click on your library source to view all your photos.
- Select the photos you wish to drag to their new album either by selecting and dragging them individually or using the short key Apple + A to select all then drag over. Just like with most other applications, when dragging files to their new destination, you should see a red number indicating the total number of files, and a green plus to indicate its a valid move.
