Disabling Security Software
Disabling Security Software
Security Software
AVG Internet Security 9.0
Disabling the Firewall
Disabling Email Scanning
Disabling Anti-Virus
McAfee Total Protection 2010
Disabling the Firewall
Disabling Anti-Virus
Nortons 360
Disabling the Firewall
Disabling Email Scanning
Disabling Anti-Virus
SecureIT
Disabling Security
AVG Internet Security 9.0
Disabling the Firewall:
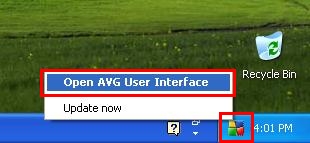
- On the taskbar in the lower right hand side you will see the AVG icon. Here you can double click the AVG icon or right click on the AVG icon and click on Open AVG User Interface.
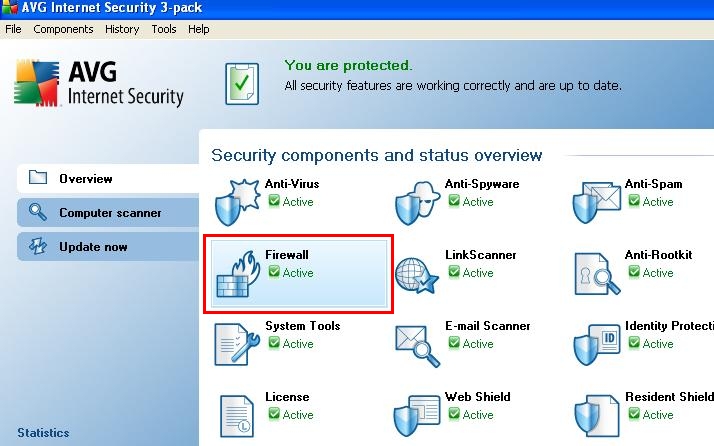
- Once the AVG User Interface has opened here you will be able to select the components you want to disable. To disable the firewall double click on Firewall.
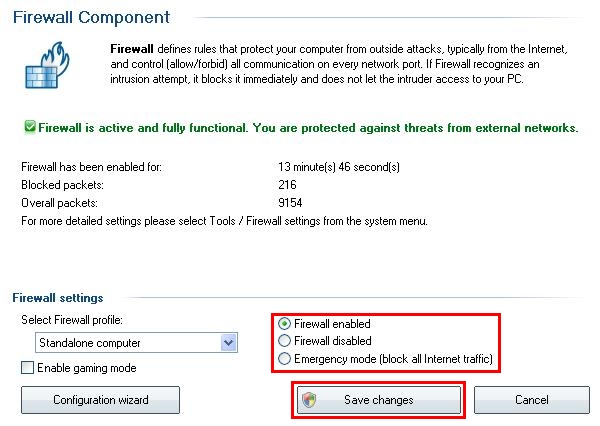
- After the Firewall window has opened here you can then click on Firewall disabled in the lower part of the screen. After you have disabled the firewall then click on Save changes.
- Once you have saved your changes, an AVG notification will popup asking you if you are sure you want to turn off the firewall, and here you will click on Yes
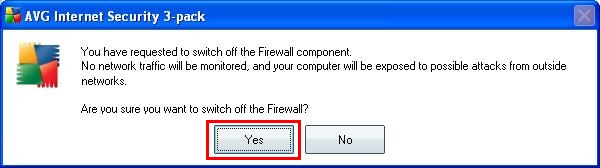
- After you click on yes your firewall will then be disabled. To re-enable the firewall you will just do the same process only by selecting Firewall enabled on step 3.
- On the taskbar in the lower right hand side you will see the AVG icon. Here you can double click the AVG icon or right click on the AVG icon and click on Open AVG User Interface.
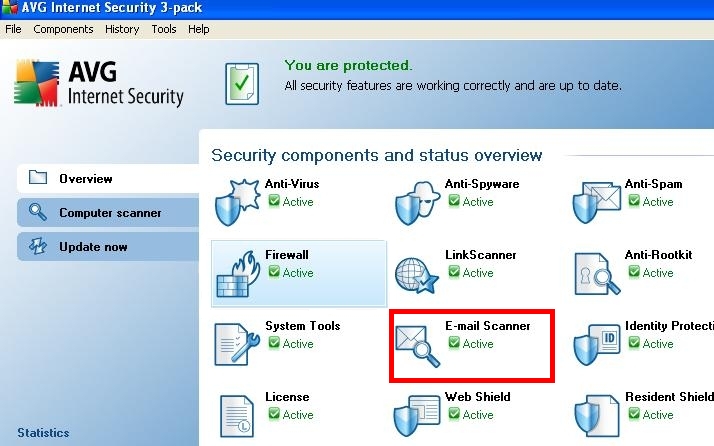
- Once the AVG User Interface has opened here you will be able to select the components you want to disable. To disable email scanning click on E-mail Scanner.
- When the E-mail Scanner window opens, you can then uncheck Scan incoming messages and Scan outgoing messages towards the bottomo of the screen. After you have unchecked the settings, you can then click on Save changes, and then you will see a notification asking if you want to change the settings and click on Yes.
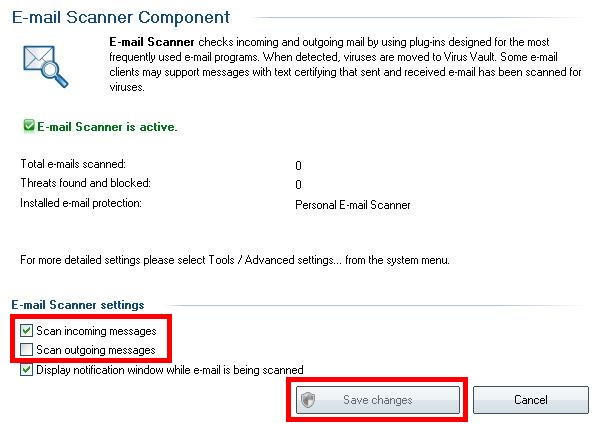
- After you have clicked on Yes email scanning will no be turned off. To re-enable the settings you will need to follow the same process by placing the check marks back in the box.
- On the taskbar in the lower right hand side you will see the AVG icon. Here you can double click the AVG icon or right click on the AVG icon and click on Open AVG User Interface.
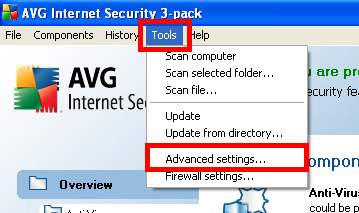
- Once the AVG User Interface has opened up please click on Tools at the top left in the menu bar. Once the menu opens then click on Advanced settings.
- When the Advanced Settings open in the left hand column select Resident Shield, once select on the right hand side window take the check mark out of Enable Resident Shield, and then click on Apply, and thenOK. After you have clicked on OK your computer will no longer scan files automatically before Windows uses them. To re-enable please just follow the steps again and just put the check mark back in.

AVG updated on 3/1/2010
McAfee Total Protection 2010
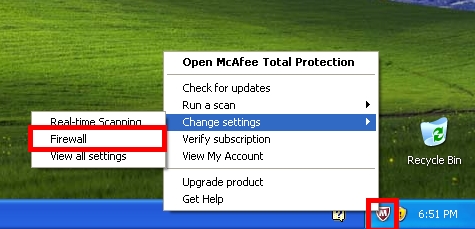
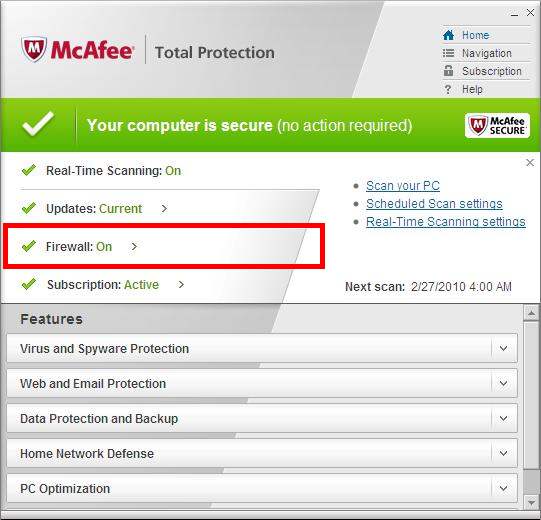
- On the taskbar in the lower right hand side you will see the McAfee icon. Then you will need to double click the McAfee icon or you can right click the McAfee icon, then select Change settings, and then you can click on Firewall. NOTE: If you did the right click option please skip step 2 and go to step 3.
- Here you will need to select Firewall, and then to the right click on Settings.
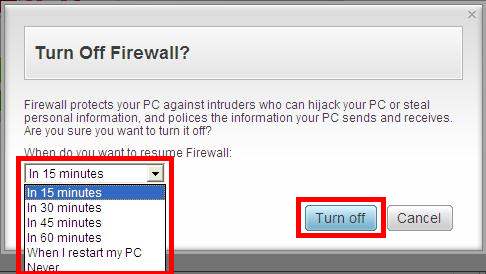
- In the Firewall window on the left hand side please select Turn off. Immediately following your click a popup will come up asking you if you are sure you want to turn off the Firewall and if so for how long. Here you will need to select a time limit for your firewall to be turned off, and then click on Turn off. After you click turn off, the firewall will then be turned off for however long you specified.

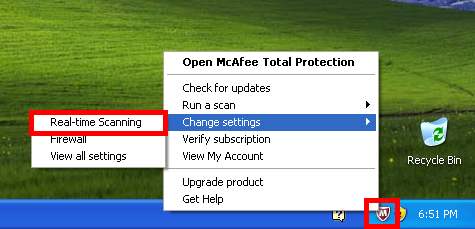
- On the taskbar in the lower right hand side you will see the McAfee icon. You will then need to double click the McAfee icon or you can right click the McAfee icon, then select Change settings, and then you can click on Real-time Scanning. NOTE: If you did the right click option please skip step 2 and go to step 3.
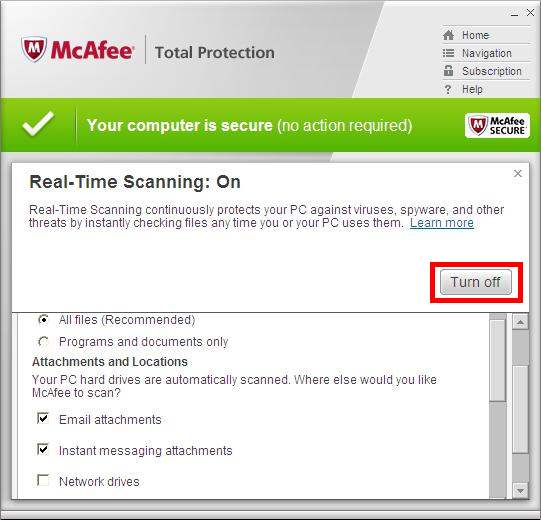
- Here you will need to click on Real-Time Scanning, and then to the right click on Real-time Scanning Settings.
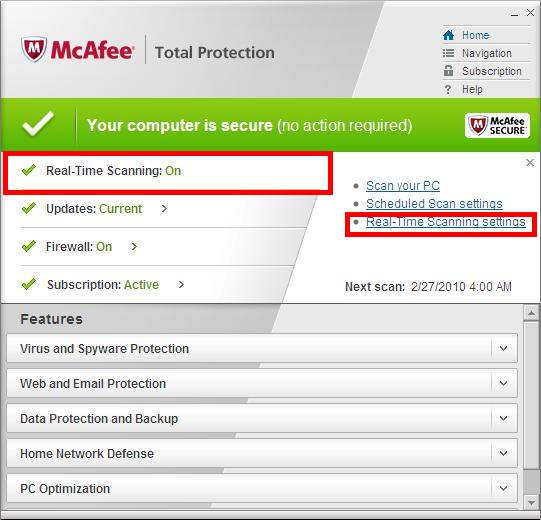
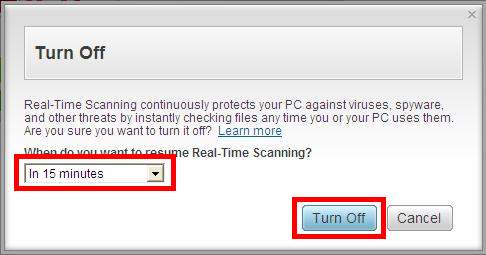
- In the settings window here you will need to click Turn off on the right hand side. Immediately following your click a popup will come up asking you if you are sure you want to turn off the Real-Time Scanning and if so for how long. Here you will need to select a time limit for your scanning to be turned off, and then click on Turn off. After you click turn off, the scanning will then be turned off for however long you specified.
McAfee updated on 2/26/2010
Nortons 360
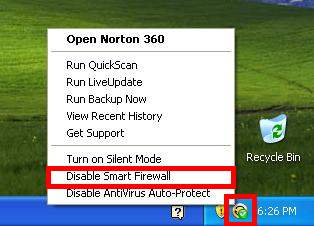
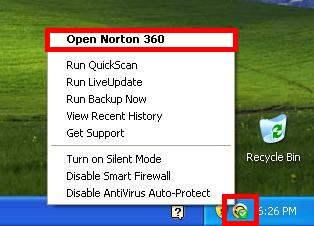
- On the taskbar in the lower right hand side you will see the Nortons icon. You will then want to right click on the Nortons icon, and then click on Disable Smart Firewall. After you click on Disable Smart Firewall it will ask you if are sure you want to disable the firewall and for how long. To see the menu click here to proceed to step 4. To see how to disable firewall from the firewall menu in the Norton 360 interface click on Open Norton 360 and proceed to step 2.
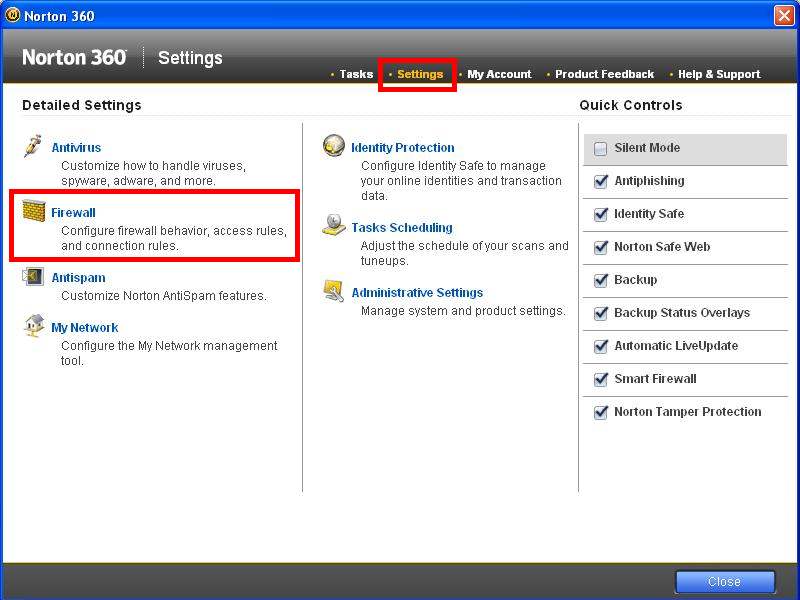
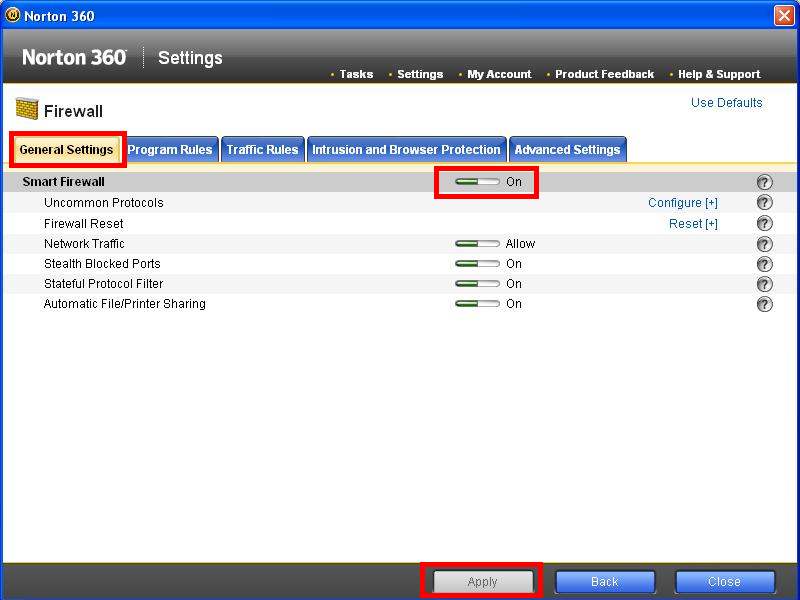
- Once you have the Norton 360 interface opened, click on Settings across the top, and then click onFirewall in the Detailed Settings window.
- After you have clicked on Firewall at the previous menu, here make sure you are on the General Settingstab. In the view below General Settings you will see where it has Smart Firewall and to the right click the setting to Off, and then click on Apply towards the bottom.
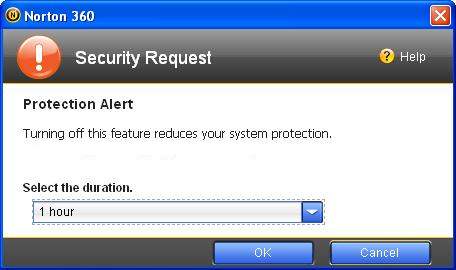
- After you disable the firewall it will ask you if are sure that you want to disable the firewall and for how long. Here you will need to select the duration you want the firewall left off and then click on OK. After you click OK, the firewall will then be turned off for however long you specified.
- On the taskbar in the lower right hand side you will see the Nortons icon. You will then want to right click on the Nortons icon, and then click on Open Norton 360.
- After the Nortons 360 interface has opened, you will want to click on Settings across the top. After you click on settings under the detailed settings window click on Antivirus.

- Once you clicked on Antivirus the menu will open, here you will want to click on the Scans and Risks tab. In this tab you will see where it says Email Scan below in the list that has an On and Off switch, click on theOff side, and then click on Apply down below.

- After you disable the scanning it will ask you if are sure that you want to disable the e-mail scanning and for how long. Here you will need to select the duration you want the scanning left off and then click on OK. After you click OK, the scanner will then be turned off for however long you specified.
- On the taskbar in the lower right hand side you will see the Nortons icon. You will then want to right click on the Nortons icon and click on Disable AntiVirus Auto-Protect.
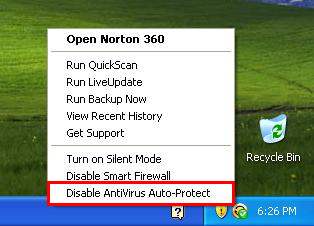
- After you disable the AntiVirus it will ask you if are sure that you want to disable the AntiVirus and for how long. Here you will need to select the duration you want the AntiVirus left off and then click on OK. After you click OK, the AntiVirus will then be turned off for however long you specified.
Nortons updated on 2/26/2010
SecureIT
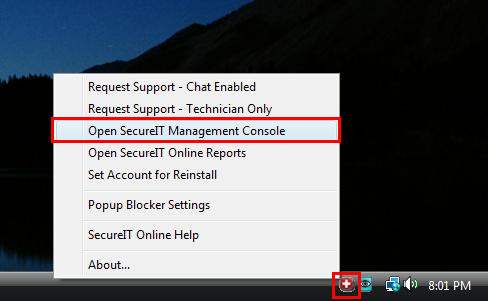
- On the taskbar in the lower right hand side you will need to right click on your SecureIT icon, and then click on Open SecureIT Management Console.
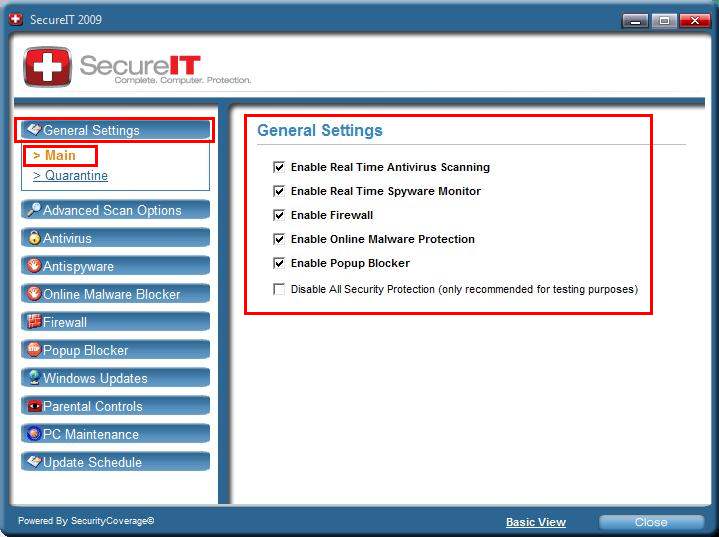
- After the SecureIT Management Console opens up click on Advanced Settings.

- Once you click on Advanced Settings the window will open. By default you should be brought to the page below, but if not click on General Settings, and then click on Main right below General Settings. In this view you will be able to see all the active security settings. This is where you will be able to disable the feature(s) that you want to have turned off. If you want to disable all security select Disable All Security Protection.
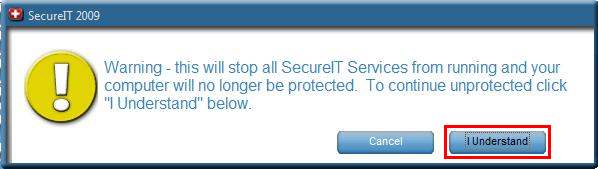
- After you have disabled a feature a window will open asking you if you are sure that you want to disable the feature you are about to disable, here you will want to click on Yes or I Understand. After you have applied this action the feature will then be disabled, and will remain off until you go back in and activate the feature.
SecureIT updated on 3/2/2010