OpenDNS
OpenDNS
OpenDNS is a free service offered to act as parental controls. By replacing Nex-Tech's auto-obtained DNS servers with static DNS servers that are provided by OpenDNS, computers will be blocked from pornography, proxy servers, phishing sites and some malware. OpenDNS may be used on a single computer or within a router so that every computer on the network will have the filters enabled.
Setup OpenDNS on your:

Setting Up OpenDNS On Your Router
Choose your brand of router:
 |
 |
 |
 |
Setting Up OpenDNS On A Comtrend Router
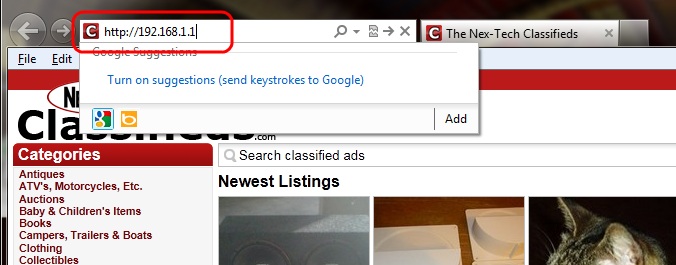
- Visit the router's IP address
Open up your web browser (Internet Explorer, Firefox, Chrome, etc.) and clear out the address bar at the top. Now type in 192.168.1.1 and press Enter
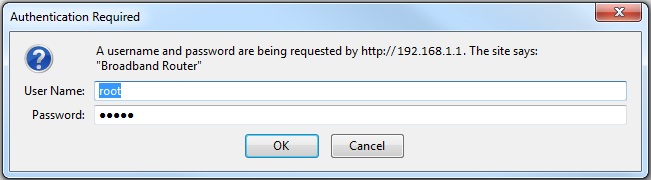
- Enter the Network password
Next you should have a popup asking for a User Name and Password. The User Name is user and the Password is user. Then press OK.
NOTE: If this User Name and Password doesn't work, you may also try the following:
User Name: root Password: central
User Name: root Password: 12345
User Name: support Password: support
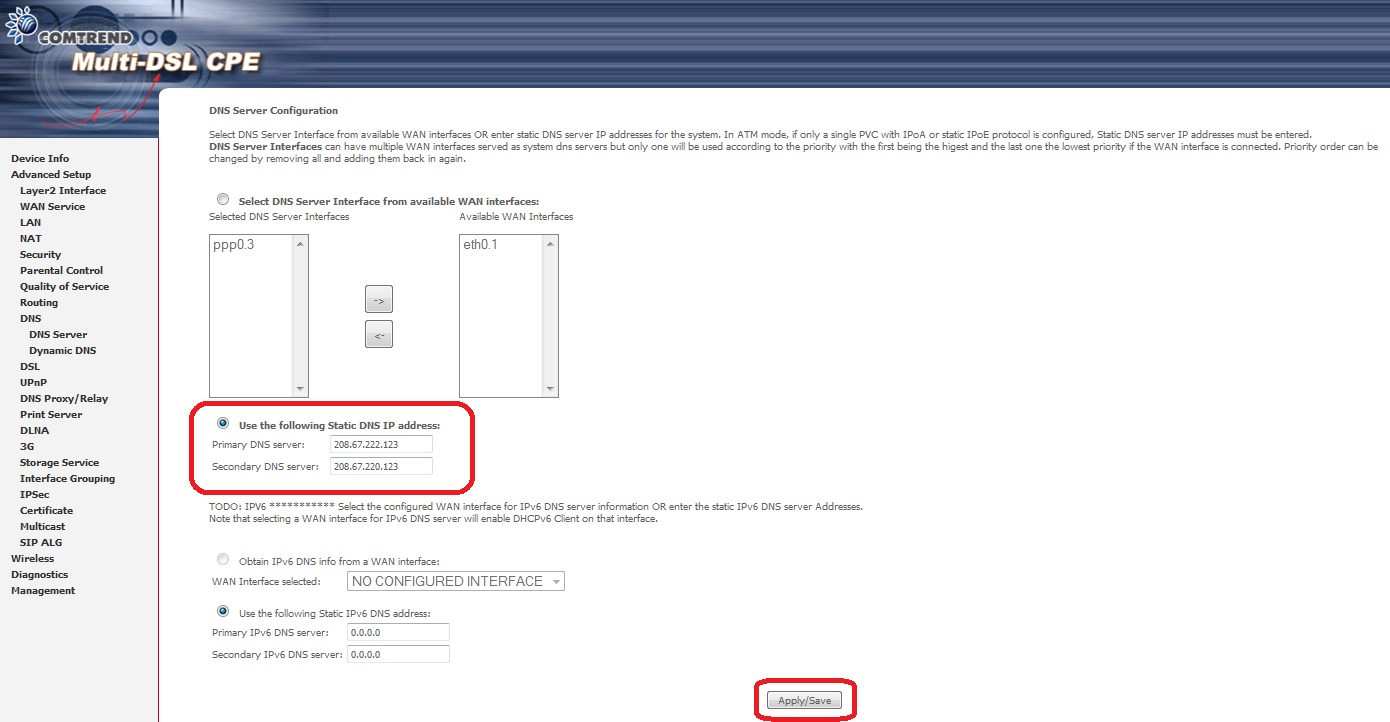
- Enter the Advanced Setup
Once logged in to the Comtrend router, click on Advanced Setup on the left side of the screen. Then click on DNS.
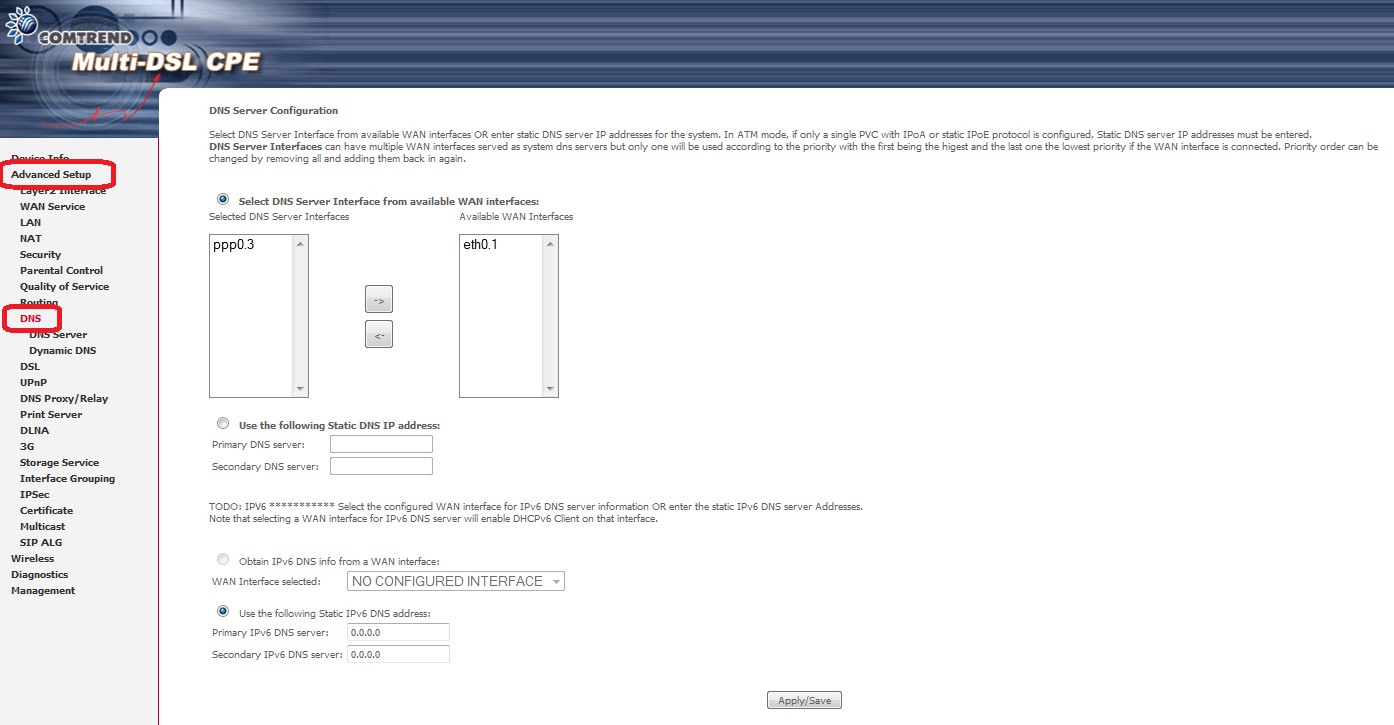
- Towards the middle of the page, put a check mark next to Use the following Static DNS IP address and type in the following DNS server addresses:
Primary DNS server: 208.67.222.123
Secondary DNS server: 208.67.220.123
Once the addresses are typed in, click Apply/Save at the bottom of the page.
- You may need to reboot the Comtrend by unplugging the power cable and plugging it back in for the changes to take full affect. Once this is complete, you should be protected by OpenDNS.
Setting Up OpenDNS On A Linksys Router
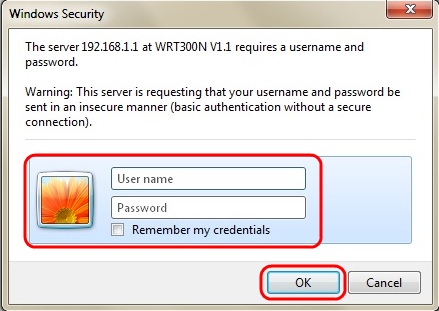
- Visit the router's IP address
Open up your web browser (Internet Explorer, Firefox, Chrome, etc.) and clear out the address bar at the top. Now type in 192.168.1.1 and press Enter

- Enter the Network password
Next you should have a popup asking for a User Name and Password. Skip the username and the default password should be admin, unless you have manually changed the password, and then press OK.
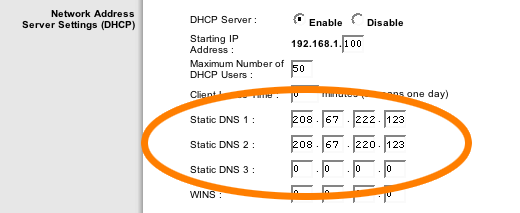
- Type in OpenDNS addresses in Static DNS 1 and Static DNS 2 fields
On the first page that loads, there should be a spot that has options for different static DNS (you may need to scroll down just a little bit). By default, they will all have 0's in the boxes. Change the following static DNS boxes to the following numbers:
Static DNS 1: 208.67.222.123
Static DNS 2: 208.67.220.123
- Click Save Settings button
After you have typed in the the numbers for both Static DNS 1 and 2, scroll all the way to the bottom and press Save Settings. You may need to reboot the router by unplugging the power cable and plugging it back in for the changes to take full affect. Once this is complete, you should be protected by OpenDNS.
Setting Up OpenDNS On A Netgear Router
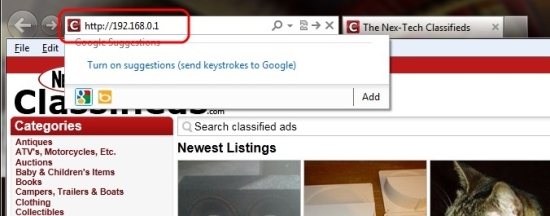
- Visit the router's IP address
Open up your web browser (Internet Explorer, Firefox, Chrome, etc.) and clear out the address bar at the top. Now type in 192.168.0.1 and press Enter.
NOTE: Some Netgear routers may use 192.168.1.1 if the first address doesn't work
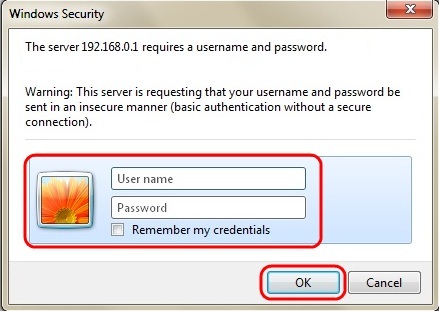
- Enter the Network password
Next you should have a popup asking for a User Name and Password. By default, the User Name is admin and the Password is password. Then press OK.
- Type in OpenDNS addresses in Primary DNS and Secondary DNS fields
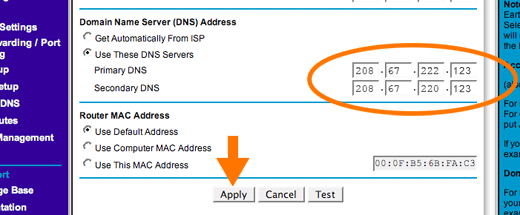
On the first page that shows up, there will be a section towards the bottom of the page that is labeled Domain Name Server (DNS) Address. Put a check next to Use These DNS Servers and type in the following DNS addresses:
Primary DNS: 208.67.222.123
Secondary DNS: 208.67.220.123
And then press the Apply button once the DNS servers are typed in.
- Wait for the settings to be updated
Once you press Apply, you will get a new screen saying that the router is Updating Setting. You may need to reboot the router by unplugging the power cable and plugging it back in for the changes to take full affect. Once this is complete, you should be protected by OpenDNS.
Setting Up OpenDNS On A D-Link Router
- Visit the router's IP address
Open up your web browser (Internet Explorer, Firefox, Chrome, etc.) and clear out the address bar at the top. Now type in 192.168.0.1 and press Enter.
- Enter the Network password
Next you should have a popup asking for a User Name and Password. By default, the User Name is admin and leave the Password (blank). Then press OK.
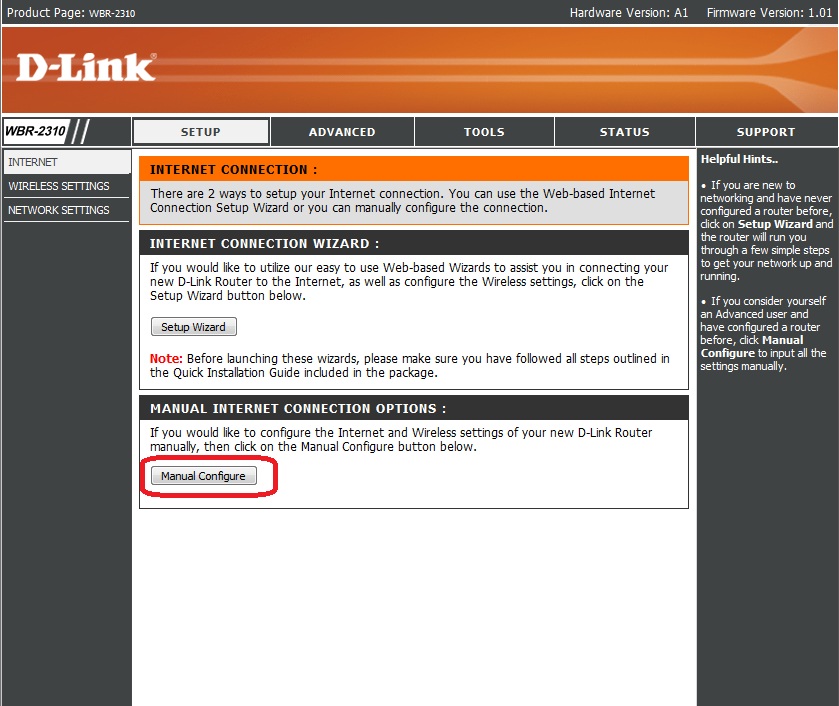
- Go to Manual Internet Connection Options
On the first page that shows up, there will be a section labeled Manual Internet Connection Options towards the bottom. Click on the button that says Manual Configure.
- Type in OpenDNS addresses in Primary and Secondary DNS Address fields
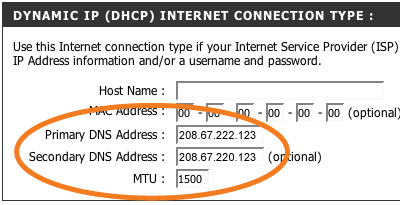
Depending on how your D-Link router is set up, you will either have a section on his page labeled Dymanic IP (DHCP) Internet Connection Type or PPPOE. Under whichever field you have, there will be a spot that says Primary DNS Address and Secondary DNS Address. By default, they will be blank. Type in the following DNS Addresses:
Primary DNS Address: 208.67.222.123
Secondary DNS Address: 208.67.220.123
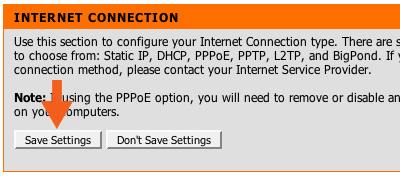
- Click Save Settings button at the top
At the top of the page, click on the button that says Save Settings. You may need to reboot the router by unplugging the power cable and plugging it back in for the changes to take full affect. Once this is complete, you should be protected by OpenDNS.
Setting Up OpenDNS On A Single Computer
NOTE: These steps were written on Windows 7, but should be similar steps on other versions of Windows.
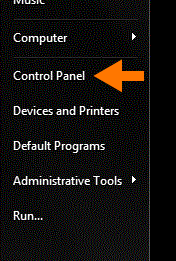
- Click on the Start button on the bottom left, and then select Control Panel
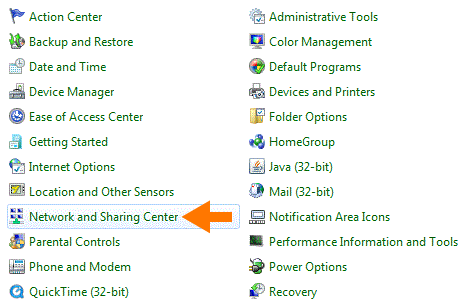
- Click on Network and Sharing Center
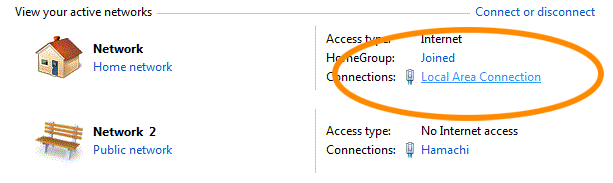
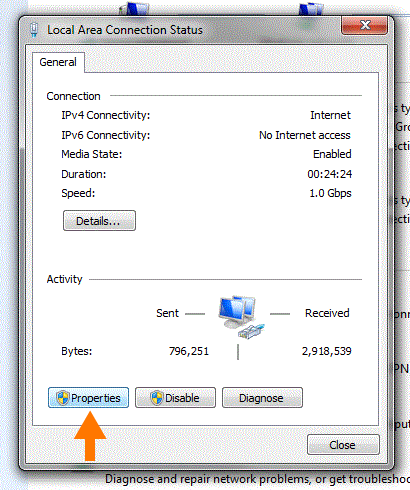
- Click on Local Area Connection under 'Active Networks'.
- Click the Properties button
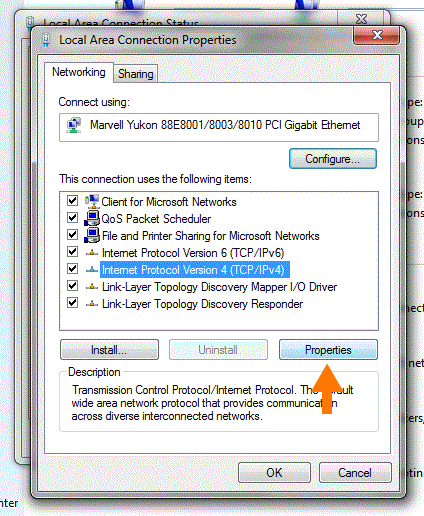
NOTE: Windows 7 may prompt you for permission to make network setting changes
- Highlight Internet Protocol Version 4 and click Properties
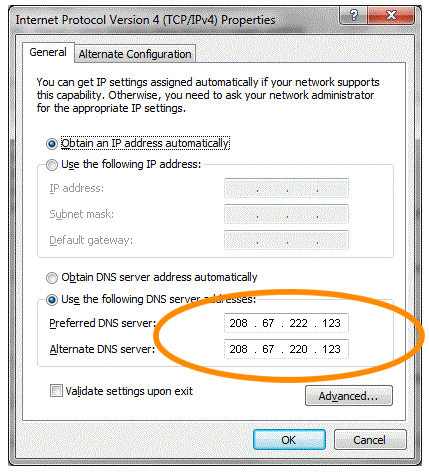
- Click the radio button labeled Use the following DNS server addresses: and type in the following DNS addresses:
Preferred DNS server: 208.67.222.123
Alternate DNS server: 208.67.220.123
- Click the OK button, then the Close button, and then Close again. Then you can close out of the Network and Sharing Center window. Once this is complete, you should be protected by OpenDNS.